

Eight years before LEGO brought us our favorite mini-doll Friends, an American sitcom was coming to an end. F•R•I•E•N•D•S ran for 10 seasons from 1994 - 2004, and to celebrate their 25th anniversary in 2019, LEGO Ideas released set 21319 Central Perk.
Today we are building the two iconic apartments where Chandler, Joey, Monica, Phoebe, Rachel, and Ross hung out when they weren't at Central Perk.
Can you BE more excited?
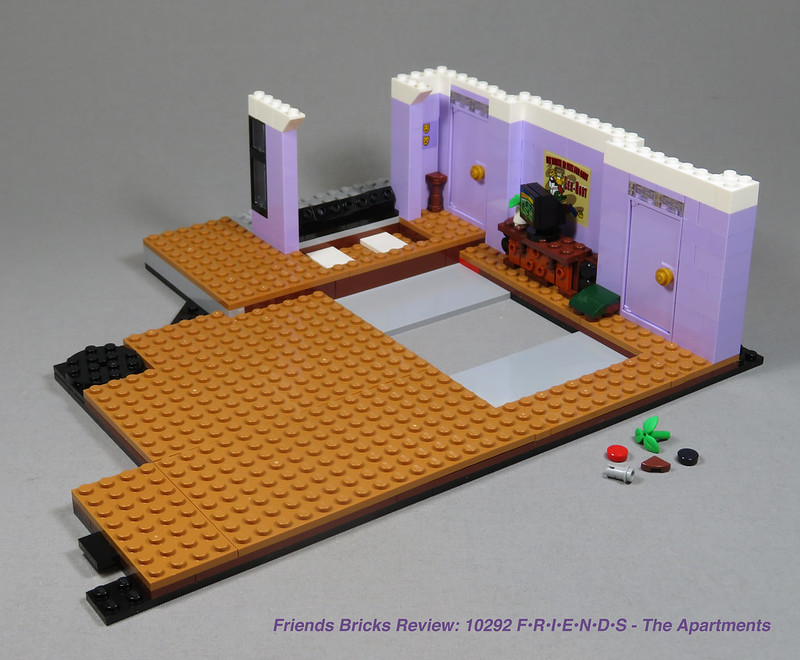
The light rigs on the corners remind us that we are on a film set, and this set up works really well for a LEGO play set. Inside the apartments, you will find little details highlighting favorite and memorable moments from the TV show. It's these details that will delight fans of the show, but if you've never watched an episode, it's still a great set.
This is set is over 2 feet wide (63 cm) when finished, so lets take a closer look at each apartment separately before we get into the build and part details. 
On the left, we have apartment 19. While the apartments changed tenants over the years, this set captures the era when Chandler and Joey were roommates. The set shows the open-plan living and kitchen area with doors suggesting the other rooms, but nothing behind them. The main living area is full of details from the recliners to the foosball table. 
On the right, is apartment 20. Again, this is early days where Monica and Rachel are roommates. The lavender walls and doors are a stand out feature, along with the tilted window looking out on the balcony and the corner sink in the kitchen. 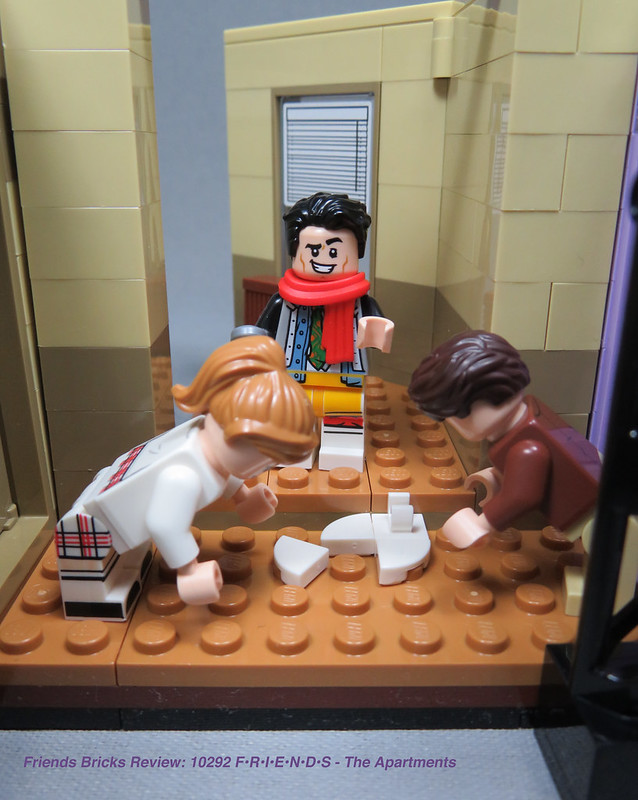
Connecting the two apartments is the hallway which hosted many memorable moments during the series, including a fight over a dropped piece of cheesecake. 
Each of the three sections are built separately and just slide together. There is a tab on each apartment that fits under a corresponding gap on the hallway. This makes the set easy to move, and allows you to display the apartments separately if you don't have space for them side-by-side.

Left to right we have Joey Tribbiani, Phoebe Buffay, and Chandler Bing. Each mini-figure has a new torso and head print. Joey also has a new leg print. The instruction book lists each character with the corresponding episode where they wore the outfit being depicted.
Joey is wearing all of Chandler's clothes. The torso print is good and shows the layers of ties and shirts. The back is printed with just a little fabric detail for the top jacket. The legs are white with a bright light orange hip section. The front of the legs are printed to show the layers of shorts and pants. Joey also gets a new, exclusive head with dual sided face printing. One side shows his quirky, lopsided smile with raised eyebrow, while the other side is a more serious expression. As far as I can tell, this is similar but not exactly the same as the head in Central Perk. The hair piece is the same used in the Central Perk set. He is also wearing a red scarf.
Phoebe is wearing a pink shirt with a purple and dark pink flower print. Her torso also features a silver necklace. The back is printed with fabric details. The print is good and it's a really cute shirt. She has monochrome purple legs and hips. Phoebe also gets a dual sided head. It looks like the head from Central Perk but has a new part number, so I'm not sure exactly what changed (if anything). I definitely like her surprised expression better than the more neutral expression. She also gets a new hair piece in bright light yellow, which captures her long, blonde hair beautifully.
Chandler is wearing a reddish brown jacket over a white shirt and a bold, printed tie. The white printing is a little light but looks okay. His tie has a lot of detail, and the printing on the jacket is also good. He has monochrome tan legs and hips. His dual sided head is also new with a big, laughing smile on one side and a smaller, closed mouth smile on the other. The dark brown hair piece is the same from the Central Perk set.

Left to right we have Monica Geller, Ross Geller, and Rachel Green. Just like the first three figures, they are wearing outfits from specific episodes. They also feature new torso prints, and both girls have new leg/hip prints.
Monica has the same dual sided head from Central Perk. Her hair is cut in a short, flip-out bob. This is a different hair style from the one in Central Perk, but is not a new hair piece. She is wearing a sand blue sweater and dark blue pants. The sweater features a lovely dark blue and lavender argyle print. Over her sweater, she is wearing a tan apron with yellow trim. This is a new exclusive torso and leg print.
Ross is wearing a dark bluish grey shirt and monochrome black pants. The torso print is rather simple compared to the other figures, but does a great job of portraying a plain, button-up shirt. It is a new print, and done well. Ross has a new dual sided head, and both faces look a bit worried/stressed with one side having the mouth slightly open. He has the same hair piece from the Central Perk set.
Rachel is wearing a white top and a red and white plaid skirt. The printing on both the torso and legs/hips is good. The legs are printed on the sides, and also feature black shoes and white knee socks. Her new dual sided head features a happy, open mouthed smile on one side, while the other side has a closed mouth smirk. The hair piece in medium nougat is not new, but it is different from the hair used in the Central Perk set.

In addition to our six main friends, we also get Chandler's on-again, off-again girlfriend, Janice Hosenstein. This figure does a great job of capturing Janice, and you can almost hear her distinctive voice as you build it. She is wearing a tan leopard print top with a fuzzy brown collar and gold necklace. The front and back torso printing are crisp and seem to have good opacity. She has monochrome pearl gold legs and hips. She also has a dual sided head with a big, open mouthed laugh and closed eyes on one side. The other side is also an open mouthed expression which could be surprised or just talking. Both faces feature her bright pink lipstick. Her new hair piece is a recolor of the piece used for Bellatrix Lestrange in dark brown. She is also carrying a magenta handbag (which is not a new piece).
Overall, it's a great cast of characters. I really appreciate that they are regular people. If you are unfamiliar with the show, the figures would still work to populate your LEGO city or MOC. You can easily mix and match parts to make your own new characters.

Before we jump into the building experience, lets take a moment to talk about the instruction book. 292 pages including the front and back covers, all in one perfect bound book. This was a surprise. Given the size of the set and that each apartment is built separately, I really expected two instruction books. I was hoping for a set where you and a friend could build side-by-side and then come together to finish the model. Having a single, heavy book feels like a missed opportunity.
The other thing to note about the instructions is that the cover only shows the six main characters as mini-figs and not the actual build. It also says F•R•I•E•N•D•S The Television Series and not F•R•I•E•N•D•S The Apartments.

I am excited that LEGO has done away with the black background on the 18+ set instructions. These are printed on a nice, neutral grey. Steps are highlighted with a green outline to show exactly which pieces are being added. I found this change made building much easier and more enjoyable.
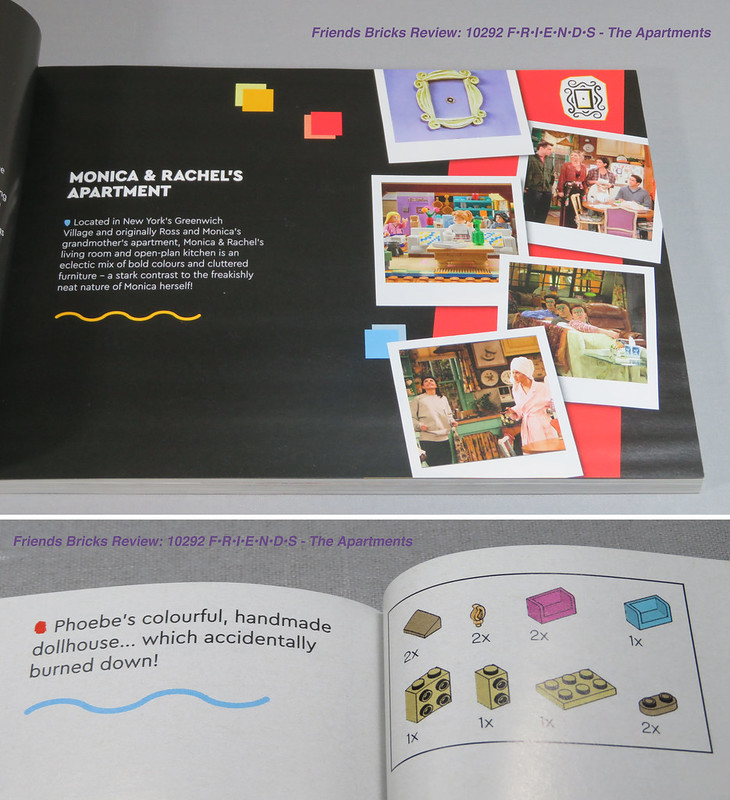
The first few pages of the instructions give a little introduction to the set and the characters. Points of interest are called out throughout the instructions as you build details that recall specific moments in the show. It's a fun detail for those of us who might not remember the show that clearly, or for those who have never watched it.
We'll take a look at the box and sticker sheet after walking through the build. We start with Chandler and Joey's apartment, then the hallway, and finish up with Monica and Rachel's apartment. There are a total of 15 bags in this set, so let's get started.

Bag one starts off with Joey and Chandler, which we have already discussed above. Chandler also gets a printed ticket to hold which is not a new piece.
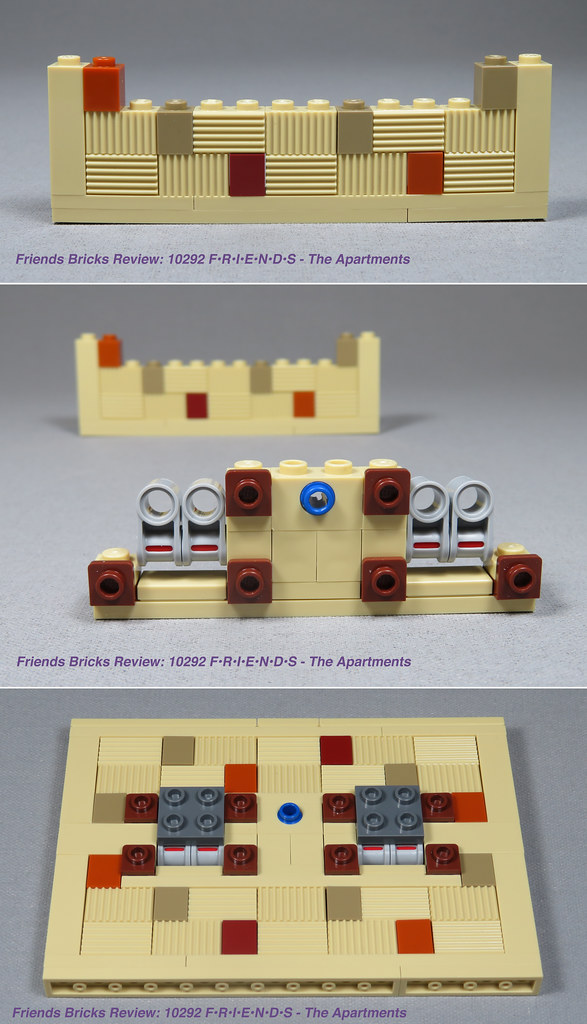
The rest of bag one is used to build the carpet in the center of the apartment and Chandler and Joey's matching recliners. There are no new parts in this first bag, but the mechanism for the chairs is worth taking a look at. We start with some simple brick stacking, add some technic and side-ways building pieces to create the reclining feature, and end up with a SNOT (studs-not-on-top) section of flooring.

Here we are just finishing up the recliners. You can see how the reddish brown brackets are used to hold the arms of the chair separate from the body of the chair, which leaves the chair free to move on the technic assembly built into the floor.

Bag one is finished with just two spare parts. You can see a photo of all the parts from bag one here.

Chandler and Joey are ready to sit back and relax in one smooth motion. Because the reclining mechanism is tied together with an axle under the floor, both chairs recline at the same time, which captures that moment when they first got the chairs.

Recliners from the front and back.

Bag two builds the rest of the floor of Chandler and Joey's apartment. There are no new pieces in this section, and only two small spare parts. Click for all bag two parts.

You can see where the recliner section of flooring will drop into place, but for now the boys are relaxing on the side and watching their apartment take shape.

Bag three starts to build and furnish the kitchen area, and we finally get to some of the new/recolored pieces. But first, we install the refrigerator.

Next we build a clever little sink using a light bluish grey 1 x 2 x 1 half cylinder brick. This is a fairly new piece which was first introduced in 2020. It has been used in six other sets previously, including set 41449 Andrea's Family House (2021). It's a nice part usage (NPU) for this compact sink.

We continue to add more details to the kitchen and are soon making two bar stools. These use a couple of rare colors. The 2 x 2 round tile in green that is used for the stool seat is a surprisingly rare color. It has only been used in set 75551 Brick-Built Minions and Their Lair. It's nice to see it getting more use.
The stool legs are also rare. While the telescope piece is very common in dark brown, it was only introduced in reddish brown in 2020. It has been used in three previous sets. Well be seeing more of them as we continue building.

As we finish up bag three, there are a few more pieces worth mentioning.
The milk carton is made from a printed 1 x 1 brick in medium blue and a 1 x 1 45° double slope in bright light blue. The double slope piece has been around in bright light blue since 2018, but has previously been used in just five sets.
The printed milk carton is ... confusing. The parts list in the back of the instructions gives the part number for the newer print showing a glass of milk. I was excited to get this new milk carton. When I opened the bag, what I got was the old milk carton print with the flower and cow. Trying to research this milk carton piece has led me to believe that it is in transition, so you might get the new one and you might get the old one. This makes it difficult to tell which sets have started using the new print or how rare it is. I'd love to know if anyone gets the new print when they pick up this set.
The 2 x 2 round tile with dart board print is new for this set. Our inset image shows the new print along with two posters that are created with stickers. The 2 x 3 tile in dark tan used for the boxing poster was a new color in 2020 and has only been used in four other sets. It's interesting that the dart board is a print since it could easily have been a sticker, and the print I got wasn't centered on the tile (I'm not sure if I would have done better with a sticker or not).

Here is how the apartment is looking at the end of bag three, along with the four spare parts (including the light bright blue 1 x 1 45° double slope). All bag 3 parts shown here.

I love how detailed this kitchen is for such a compact space. The use of the tan windows with tan inserts makes very convincing cabinets, and you can clearly tell what each appliance is.

Bag four will build the back and right walls of the apartment and the foosball table, but first we have to make a choice. Let's get Joey and Chandler over here to help. They can hold down the sticker sheet and show us what our choices are.
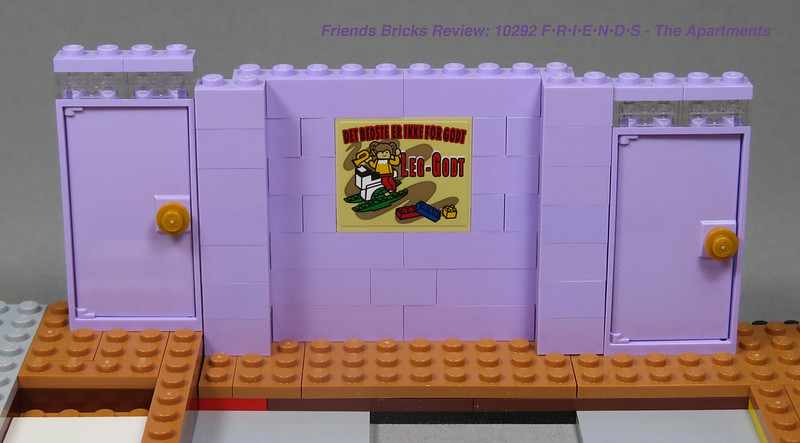
There are three stickers included for the white board on the back of the entrance door. Which one should we use? The other two stickers will not be used, and there are no extra doors included to make switching the sign easy. Choose carefully. I'm going with the "Went to Coffee" as a nod to the previous F•R•I•E•N•D•S set.
While we are adding the sticker to the door, note that the 1 x 4 x 6 door frame with two holes on top and bottom has been around in dark tan since 2017 but has only been used in six sets. The 1 x 4 x 6 door with stud handle, however, is new in dark tan and the apartment has four of them.

Here's the door in place with our chosen sticker. The sticker isn't a perfect color match, but it's close enough that it doesn't bother me. If it bothers you, you can trim the sticker before placing it.

The right wall of the apartment is straight forward brick stacking with a couple of sideways bricks used to hold a message board and the intercom. The message board is created with a sticker. The intercom is a 1 x 1 tile in light bluish grey with four white stripes which was a new print in 2020. It has been used in two sets before this one. Notice the clip in the wall? We'll get to that below.
Four more 2 x 3 tiles in dark tan are used on the back of this wall section. We'll get a photo of those when we attach the hallway later.

Four more reddish brown telescope pieces are used as the legs for a small side table. On the table is a book. A sticker is used for the interior 1 x 2 tile. The book clips onto the wall so we don't have to worry about it falling off the table as we build. This causes the book to hover just a little above the table, but I definitely prefer this over having the book sliding off the table every time I need to move the build.

With the right wall in place, it's time to add the foosball table. This is a fun little build, and I love getting more trophy figures in black and pearl gold. The pearl gold trophy is more common, while the black trophy has only been used in five sets. They are perfect for our soccer/football players.

With the foosball table in place, we move to building the back wall. There is another dark tan door. Two dark tan door frames are used for the windows which get stickers to represent the blinds. The hockey stick with round shaft was new in 2020 and has been used in four other sets. The tennis racket is not new, but I don't have one so that's nice to get.

We finish off bag four in the corner. Another sticker is used for the poster, and a black 1 x 4 technic gear is used to create a CD rack. Just a few more spare parts, including one each of the black and gold trophy figures. Here are the bag four parts.

Bag five starts by adding the left wall. This is more brick stacking with two more dark tan doors. There is also another poster that uses a sticker.

Next we add some lamps in front of the windows and curtains. It's a simple but effective build. The 1 x 6 plates in medium nougat used behind the curtain tiles is fairly rare. It was a new color in 2020 and has shown up in five other sets so far.
With the walls done, it's time to start adding more furniture.
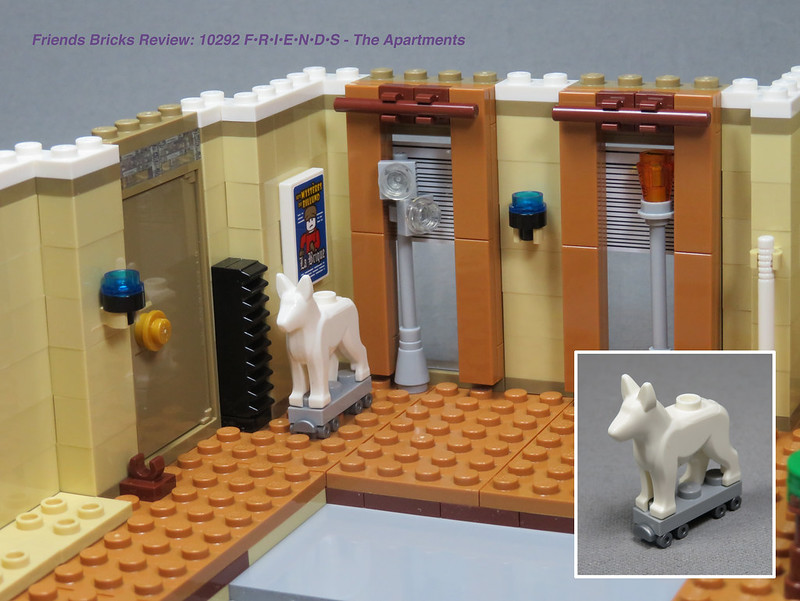
A few more wall sconces are added, and the statue of the white dog. The german shepherd has been around for a long time, but I can't find any reference of it being used in just white. As far as I can tell, this is new in that it doesn't have a print.

We build a yellow couch and place it in front of the windows. Then we build a coffee table. Trans-light blue tiles are used to give it a glass top. The pizza and newspaper tiles on top are existing prints.

Here are the spare parts from bag five, and all of bag five parts are here.
Chandler and Joey's apartment is almost done; just one more bag.

Bag six starts with building Janice, but since we looked at all the mini-figs above, we'll just keep building. A layer of white bricks and tan plates are added around the top edge to tie all wall sections, doors, and windows together. Then we build the film studio lighting that goes in each corner (not shown in the photo above). This makes all the walls sturdy, and we no longer have to worry about accidentally knocking out a door.

Next we build the entertainment console. Two 1 x 3 x 3 flat front windows are used to create the front of the console, with brick built layers behind for all the components. The windows were new in 2020 and were used in four sets. The sticker used for the television screen shows Joey as Dr. Drake Ramoray in his first major acting role.
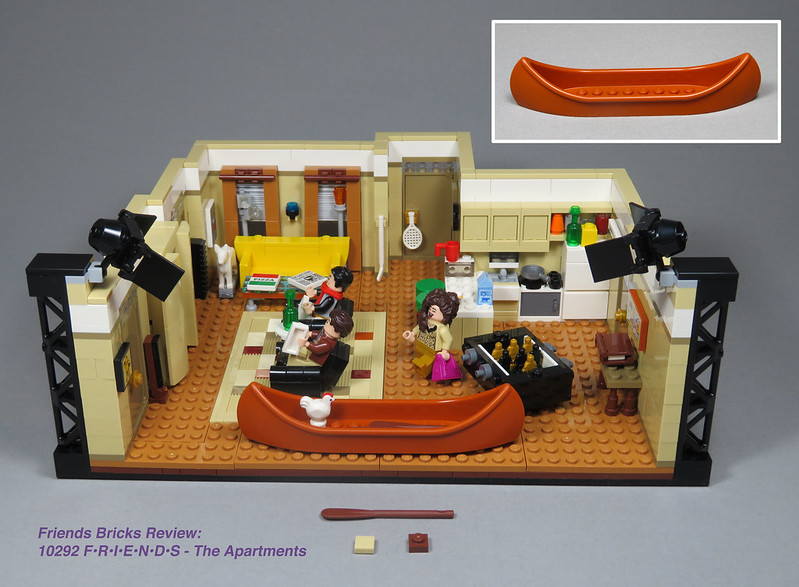
We add the canoe from the episode where Chandler and Joey get robbed of all their furniture. The canoe is new in dark orange. We also add a chicken. The white bird that we added to the counter earlier represents a duck (it would have been nice to get a new duck mold, but the bird works well enough). These are the pets that Joey and Chandler adopted and raise through the series.
To finish the apartment we drop the recliners from bag one into the opening in the floor. Just three spare pieces. You can find all the parts from bag six here.

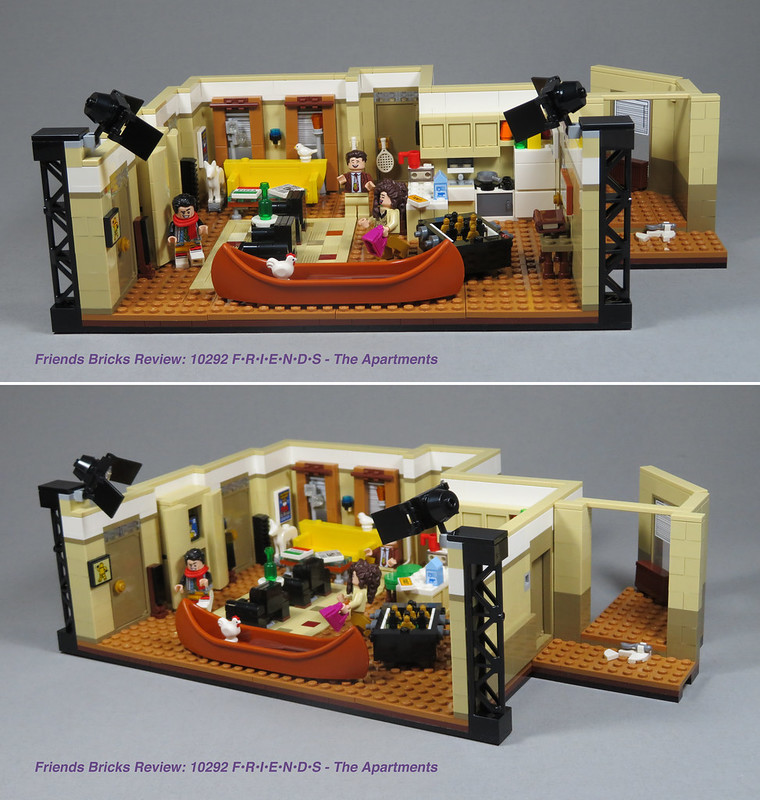
Here's the finished apartment. I am impressed with the level of detail. It's not a complex build, but it is a fun build. There is a lot here. I loved building all the little pieces of furniture.

Here are a few other angles of the apartment. The exterior and back are rather plain, but they don't need the detail of the interior. This is a television set where all the action takes place inside, and the build reflects that.

Having finished Chandler and Joey's apartment, we build a small hallway that will connect to Monica and Rachel's apartment. The back wall of the hallway is built at an angle to block sightlines, like it would on the television set. The 6 x 6 cut corner wedge plate used for the floor on this angled section is new in medium nougat. We also get another dark tan door frame with a window shade sticker.

Next we build up the side wall. The 2 x 2 corner bricks in dark tan were new last year (2020) and have only been used in five sets previously. The 1 x 2 fluted bricks are not at all new, but are perfect for the radiator under the window.

The finished hallway has just a few extra parts. All bag seven parts here.
The memorable cheesecake scene is represented by three white quarter round 1 x 1 tiles and a clip to hold ... a spoon. While a new fork mold would have been more accurate, the spoon works. We do get an extra spoon in the spares so you can give both Rachel and Chandler a spoon if you set up the cheesecake eating scene.

The tab on the apartment will just slide into the slot on the hallway to hold them in place. This makes removing the sections easy for different display options.
Here you can see the 2 x 3 dark tan tiles mentioned above that are used to create the color change along the apartment wall. This is a great way to get a single colored wall on the interior of the apartment, but still match the two toned walls of the hallway without building double thick walls.
With the hallway attached to Chandler and Joey's apartment, you can see how the angled wall blocks a the view to the back and creates the illusion of the set continuing further.

Monica and Rachel's apartment will use bags 8 - 15. We start bag eight with building Rachel and giving her a coffee to-go cup.

Then we build another drop-in floor section. There are plenty of attachment points for adding furniture later, and Monica won't have to worry about anything being slightly out of place when we're finished.
The 1 x 1 x 3 bricks used in the border are new in dark blue. We have five small spare parts as we finish this section. All bag eight parts.
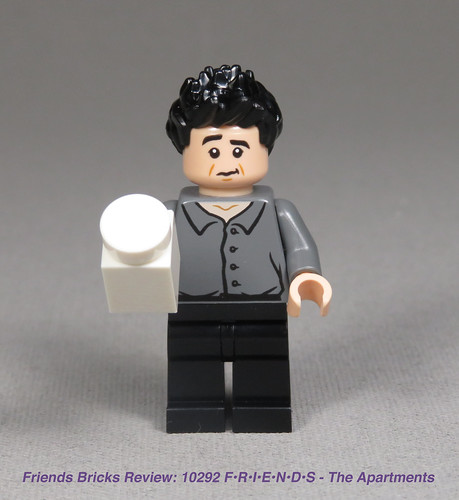
Bag nine starts with building Ross, and we give him a white container. If you are not a fan of the show, or if it's been a long time since you watched it, this could be a generic container of whatever you imagine. For our super-fans, you will realize those plain black legs represent Ross's leather pants, and that white container is powder.

Bag nine adds furniture to our floor section from bag eight. We start with a comfortable white sofa. 2 x 2 Minecraft tiles with a pixelated yellow and blue pattern are used as throw pillows. These are from set 21160 The Illager Raid (2020) and haven't appeared in any other sets. I love how the posing bar is used to attach the pillows at an angle.

This bag is all about building mini-fig furniture. Along with the sofa, we add a comfortable chair and a pair of side tables.

There are no new pieces in the coffee table, but I like how it's built. A careful combination of plates and tiles creates a lovely half-stud overhang and several places to attach items; like the newspaper, wine bottle, and cup.

This little chair however uses a couple of parts worth mentioning. The 2 x 1 inverted, curved slope has only been used in set 75255 Yoda (2019) and set 75318 The Child (2020). The 1 x 2 modified plate with bar handle on end has only been used in four other sets (new in 2019). We get two of each to make this chair, and I always like to get more pieces in sand green.

Our fully furnished section of flooring is ready to drop in, so we better build some place to put it.
There are a handful of spare parts, including an extra posing bar. Again, here's a photo of all bag nine parts.

Bag ten builds the rest of the floor for Monica and Rachel's apartment. There are actually two bags marked 10, and we also use the large pieces that were packaged separately with the canoe.
There are two pieces of note here: the 2 x 12 plate in lavender and the two 8 x 16 plates in medium nougat. Both of these pieces were first used in 2019 but have been used in only two previous sets each.
There are no spare parts from bag ten. You can see all the parts from both bags 10 here, and the separately packaged large pieces here.

Next we start building the walls of Monica's apartment. We get new lavender doors! Both the 1 x 4 x 6 door frame and door with stud handle are new in lavender and so far exclusive to this set. We will be getting a total of 4 complete lavender doors.
Here's the first two doors on either side of the right wall. The poster is done with a sticker on a tan 1 x 4 x 3 panel piece.

Under the poster, we build the entertainment center. Of note, is the 1 x 3 plate with 2 studs (double jumper) that was new in dark orange in 2020. It has appeared in five other sets. The television has a sticker showing an American football game.
Here's how the apartment is looking at the end of bag eleven with the few spare parts. All bag eleven parts are here.
You can see the hinges in place that will be used later for the tilted balcony window. Also the comedy/tragedy faces on the sticker in the corner don't quite match the color of the bricks. This stands out to me more than the dark tan sticker in Chandler and Joey's apartment. It would be nice if the stickers and bricks could get a closer color match or if they had less of a border around the image.

In bag twelve, we start working on the balcony. First up is the emergency escape, with more NPU (nice parts usage). The black sausages are perfect for curving the railing over the edge of the balcony.
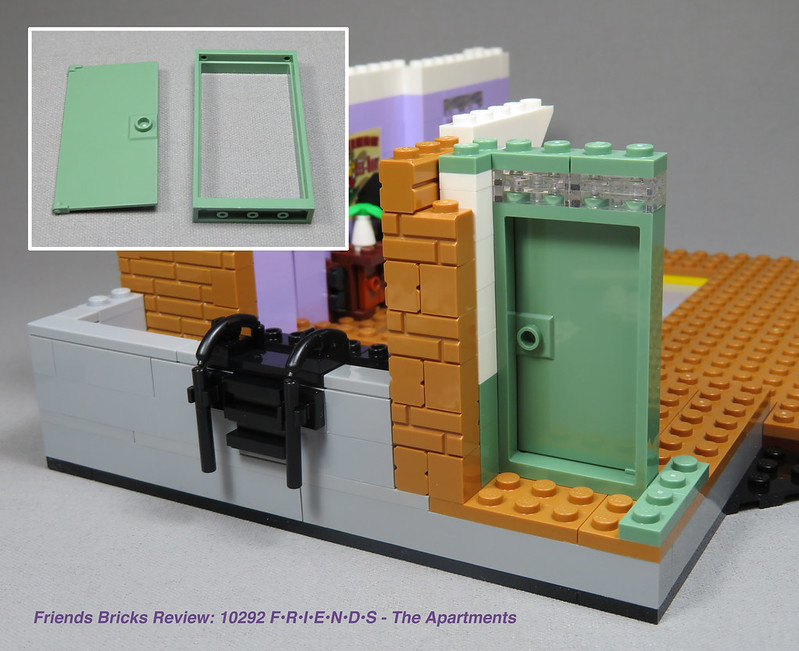
In addition to all the lavender doors, we also get a sand green door. The 1 x 4 x 6 door frame in sand green is a new color for this year. It has also been used in set 60292 Town Center. The matching door in sand green is a new color for this set.

We close off the back of the sand green door with a white window panel in another dark tan door frame and brick up the apartment wall. The balcony is finished with a cat (no, it's not a new cat, but I like cats) and a white "poking stick." For fans of the show, the poking stick will recall a specific episode; for everyone else, it could easily be left out. It doesn't stay together very well, but works for recreating the specific show scene.
Spare parts include an extra sausage and black bar. Bag 12 parts are here.
Here's a look at our progress so far from inside the apartment.

We start off bag thirteen with Monica. She gets a whisk and a turkey. I really want to remove Monica's head and replace it with the turkey, but it is a standard LEGO turkey which doesn't even snap onto the table well. Still, it will remind fans of a specific Thanksgiving episode where the Mr Bean joke comes to Americans.

Back to furnishing Monica and Rachel's apartment. We build another little drop-in floor section for the desk in front of the balcony window. The 1 x 6 tile in sand blue used on this sub-assembly has been around since 2005 but has only appeared in three other sets.

Our third lavender door gets placed perpendicular to the sand green door, before we move to furnishing the kitchen area.

There are several rare parts to note while we lay the ground work for the kitchen, and most of them won't be visible when we finish.
- The 1 x 3 tiles in metallic silver first came out in 2018 and have only been in three other sets.
- The 1 x 3 modified plate with 2 studs (double jumper) is new this year in dark turquoise. It is also available with Bone Goomba in the Super Mario Character Pack series 2.
- The modified 1 x 2 triangular tiles in reddish brown came out in 2019, but are only available in four other sets.

We start to add cabinets, and then use three bright light yellow modified 2 x 2 x 2/3 plates with 2 studs on the side as part of the sink assembly. These were new in 2020 and have only been used in three other sets. The sink assembly gets placed on a turntable so it can create the angled corner of the kitchen.
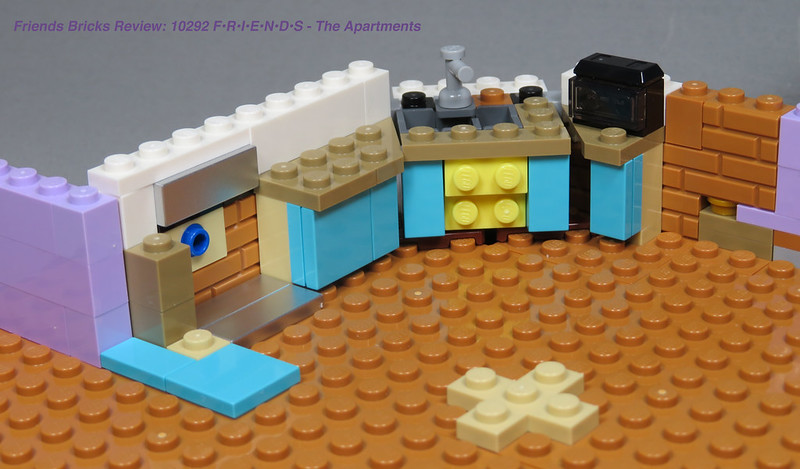
A microwave goes on the counter next to the sink. The third 2 x 3 metallic silver tile gets placed on the wall. This is where the stove will go.
All the bright colors perfectly capture the apartment from the television series, and make a cheerful space.

We've reached the end of bag thirteen, but there's still a lot of kitchen left to build. Just three spare parts including an extra whisk. Here are bag thirteen parts.
Let's keep going.

We start out bag fourteen with Phoebe. She gets a paintbrush. While we have gotten green tipped paintbrushes before, they usually have a silver ferrule. As far as I can tell, the lack of a silver ferrule makes this a new paint brush piece.
We also build Phoebe's dollhouse, which catches on fire in one of the episodes. It's a cute little micro build, and you can easily leave off the flames if you don't want it to burn down.

Shiny metallic silver 1 x 2 tiles are used on the stove assembly and attached to the pin on the wall. The tiles are fairly rare. They have been around since 2018, but have only appeared in five other sets. They make such a pretty stove. Too bad it will be mostly hidden once the rest of the kitchen is finished.

A 1 x 2 x 3 flat front window in medium azure is added on it's side to create a shelf in the back of the kitchen counter. This color has only been used in set 10270 Bookshop (2020).

We add some pizza boxes and a juice container to the counters. Then we start building up the wall and open shelves.

I love the window and curtains in the corner behind the sink. There are several rare pieces used to create this window.
- The 1 x 2 x 2 flat front window in medium azure. This piece has been around since 2016, but has only been used in six other sets. It's nice to get a couple here that match the 1 x 2 x 3 window that we used earlier.
- The 1 x 2 x 2/3 30° slope in bright light yellow was new last year (2020) and has only been in three other sets.
- The 2 x 1 inverted, curved slope in bright light yellow is very rare. It has only been used in set 10271 Fiat 500 (2020).
- The 2 x 2 plate in bright light yellow was a new color in 2020 and has been in five other sets so far.

Here's the window and curtain assembly in place. Bright light yellow is a fairly new color, and it's nice to get so many pieces in this set.

We finish up the kitchen appliances with another refrigerator. Can you tell I'm enjoying all the appliances and furniture?

Next we add the fourth and final lavender door. This door has another sticker to create the frame around the door peephole. Once again the color of the sticker background doesn't match the color of the plastic. This one really feels like it should have been trimmed closer to the design.
We also add another 1 x 1 tile in light bluish grey with four white stripes for the intercom just like the one in Chandler and Joey's apartment.

We finish bag 14 with the bright light yellow cabinets over the refrigerator. The 2 x 2 tiles in bright light yellow were new in 2020 and have only been used in three other sets.
We also have several nice spare parts, including a spare paintbrush. Here are all the parts from bag fourteen.

We start our final bag of parts by building more chairs. Each of the four chairs around the kitchen table are different.
One chair uses a bright light blue 2 x 2 tile for the seat and a bright light blue 2 x 3 modified tile with clips for the back. The 2 x 2 tile has been around since 2017 but has only been used in five previous sets. The 2 x 3 tile with clips has been around since 2018 but only used in two other sets.
Another chair uses an up-side-down 1 x 2 jumper arch in tan for the top of the chair back. This piece was first used in 2018, but has only appeared in four other sets. This is a fun use of that unique piece.
The other two chairs use more common pieces but are interesting builds. While I don't think these chairs match the television series exactly, they do convey the same mis-matched aesthetic from the show.

Once the chairs are in place, we build the table. It uses a 4 x 4 round plate with hole in tan. This was a new color in 2020 and has only been used in three other sets.

With the table and chairs in place, we add a shelf next to the refrigerator, and a side table along the wall of the closet alcove. The table uses two 1 x 2 round plates with open studs in bright light yellow. These have only been used in set 10271 Fiat 500 (2020).
A pillar of bricks is added to the open side of the room to support a ridge beam that separates the kitchen/dining area from the living room. This giant 1 x 16 brick in reddish brown has only been used in three other sets (first used in 2019).

Next, we build the balcony window and curtain. The curtain uses several rare pieces in bright light yellow:
- The 2 x 1 x 3 inverted 75° slope in bright light yellow is used for the upper part of the curtains. It has been around since 2014 but only used in five other sets.
- The 1L bar with 1 x 1 round plate is used to connect the upper and lower curtains through a gold 1 x 1 round hollow stud plate. The 1L bar in bright light yellow was new in 2020 and has only been used in four other sets.
- More 1 x 2 round plates with open studs in bright light yellow connect to the 1L bar and create the center of the lower curtain. It has only been used in set 10271 Fiat 500 (2020).
- A 1 x 1 plate and a 1 x 1 x 2/3 30° slope in bright light yellow make up the rest of the lower curtain. The slope has also only been used in set 10271 Fiat 500 (2020).
I love how these curtains look.

The window and curtain assembly slots into place and then tips forward on the hinge pieces that we added back in bag eleven. It's a great detail to get right.

With our build almost complete, we stash some junk in Monica's messy closet. Part of this junk is a plain, light aqua mini-figure head, which has only been used in two other sets since it was first introduced in 2018.

Finally, we slip that first bit of flooring into place. Monica and Rachel's apartment is finished, but we still have one thing left to build.

Gladys is Phoebe's creepy sculpture that features in one episode, and we get to build our own lego version of it.

Now we're done. Just a few final spare parts, including a 1L bar with 1 x 1 plate in bright light yellow. And our final link to all of bag fifteen parts.

The second apartment is just as detailed as the first one. Both are a real treat for builders who like decorating interior spaces. While the techniques aren't difficult, each brick is used to convey the unique aesthetic of the F•R•I•E•N•D•S television sets.

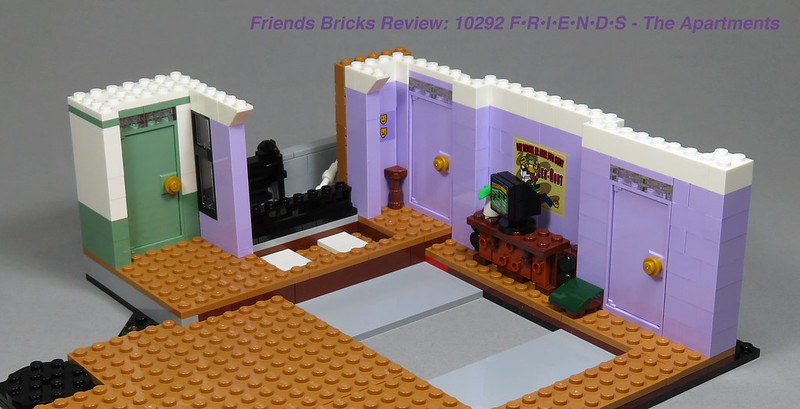
Here are a few more photos of the second apartment. The exterior and back are a little more interesting than the first apartment, especially with the balcony.

Monica and Rachel's apartment with the hallway attached.

Both apartments finished and displayed together. I like how the front edges are offset from each other. It gives the build a little more depth. Unfortunately, it does put the hallway in more shadow than if the fronts were even.

I felt like there was a reasonable amount of stickers for a set of this size. Each one adds important details that helps sell this as a very specific place. A few of the stickers could benefit from a closer trim to minimize the color difference between the print and the plastic, but that should be easy to fix if it bothers you.
The sticker sheet was packaged with the instruction book and came fairly flat.

The box follows the now familiar black box format of the 18+ line. On the front of the box, the F•R•I•E•N•D•S logo has "THE APARTMENTS" written under it giving us our set name. This is the only place where it is labeled as "The Apartments," everywhere else the logo has "The Television Series" under it.
The finished set is shown on a plain, black background. The build is slightly cropped on the box front and only shows a hint of the studio lights on the outside edges. Below that is the LEGO logo and the seven included mini figures with their given names. The very bottom is a medium azure brick border with the set number and number of pieces.
The left end of the box has a portrait collage of the included mini-figures.
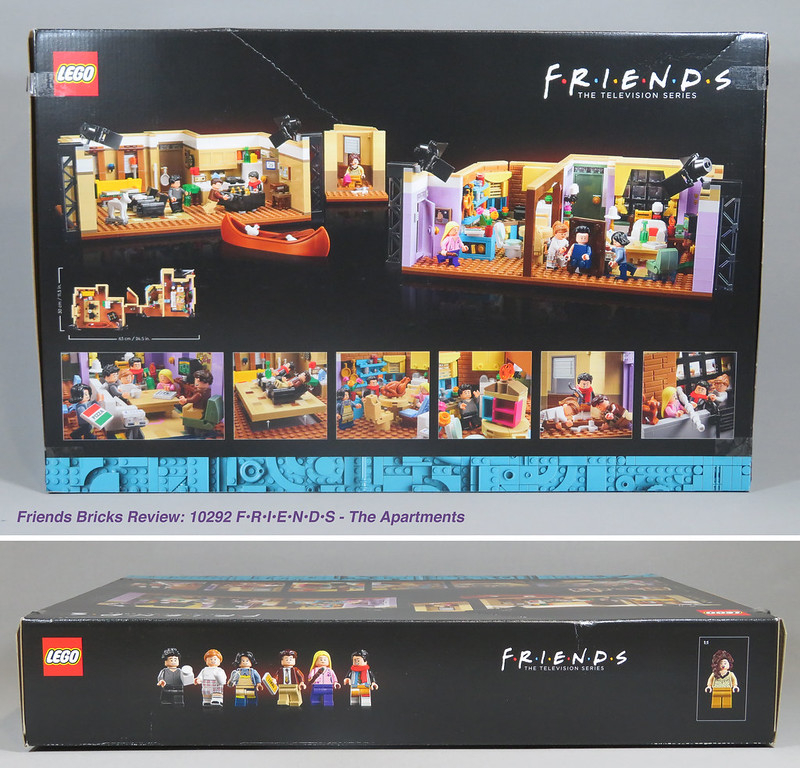
The back of the box shows that the completed build can be separated into sections. It also has an overhead view showing the finished dimensions. Below that are six images showing specific moments from the television series being portrayed with the completed set and mini-figures.
The top edge of the box again shows the seven included figures, and uses Janice as the 1:1 scale reference.

If you've read this far, thanks for sticking with me. I hope you have enjoyed walking through this build.
Summary:
This is a big set. While I'm sure some fans would prefer this to be released as two smaller sets (one for each apartment), I actually like that both apartments are included. So much action in the television series moves back and forth between the apartments. I think it's good to have them together for playing out your favorite moments. With both apartments it provides more play/display options.

For the super fans of F•R•I•E•N•D•S, you wanted this set when you read the announcement that it was coming out. This is an ideal purchase. Pop the old episodes on your TV and enjoy the build. You will have fun remembering all your favorite moments as you add each detail.

If you aren't a super fan, give this set a second look. While I watched F•R•I•E•N•D•S back in the 90s, I had not seen any episodes since it ended (I did rewatch a few while writing this review). I'm not a super fan. While trying to catch all the details is fun, I would miss most of them without the call outs in the instruction book (or by rewatching select episodes mentioned in the instruction book). You don't need that kind of knowledge of the show to enjoy this build. I had a lot of fun.

I recommend this set for AFOLs who enjoy building mini-figure scale furniture and loading their builds with homey details. It's great for people who enjoy building vignettes. I especially recommend it for adults who are getting back into LEGO after their dark ages and are still learning all the cool techniques available with today's brick selection. Never built a SNOT floor? This shows you how easy it is. Trying to figure out how to build furniture for your mini-figs? This set is packed full of examples.

I also think LEGO/toy photographers will also enjoy this set. They can capture scenes from the series or set up their own stories. With all the details and the open front, there are endless scenarios that can be displayed.

Happy Building!
-prrbrix
---
Disclaimer:
This set was provided by The LEGO Group for the purpose of sharing set details with fans.
Opinions provided here solely reflect those of our reviewer.
Photographs are property of Friends Bricks and are not directed by TLG in any fashion.
4 comments:
Très bon!
Such an amazing set! I just really wish they made such a set of Leonard's and Penny's apartments from The Big Bang Theory, I think they're missing the opportunity. I'd definitely buy that one.
Wow, just wow! Thanks for the super detailed review!
Does anyone knows what tennis racket on the door resemble? Why it's on the door handle? There was episode with Chandler and Monica playing tennis with his boss, but why it is attached to the door?
Post a Comment
Note: Only a member of this blog may post a comment.